Deploying vLLM models on Azure Machine Learning with Managed Online Endpoints
Table of Contents
Introduction #
In this post, we’ll explain how to deploy LLMs on vLLM using Azure Machine Learning’s Managed Online Endpoints for efficient, scalable, and secure real-time inference. To get started, let’s briefly look into what vLLM and Managed Online Endpoints are.
You can find the full code examples on csiebler/vllm-on-azure-machine-learning.
Introduction to vLLM #
vLLM is a high-throughput and memory-efficient inference and serving engine designed for large language models (LLMs). It optimizes the serving and execution of LLMs by utilizing advanced memory management techniques, such as PagedAttention, which efficiently manages attention key and value memory. This allows for continuous batching of incoming requests and fast model execution, making vLLM a powerful tool for deploying and serving LLMs at scale.
vLLM supports seamless integration with popular Hugging Face models and offers various decoding algorithms, including parallel sampling and beam search. It also supports tensor parallelism and pipeline parallelism for distributed inference, making it a flexible and easy-to-use solution for LLM inference (see full docs).
Managed Online Endpoints in Azure Machine Learning #
Managed Online Endpoints in Azure Machine Learning provide a streamlined and scalable way to deploy machine learning models for real-time inference. These endpoints handle the complexities of serving, scaling, securing, and monitoring models, allowing us to focus on building and improving your models without worrying about infrastructure management.
HuggingFace Model Deployment #
Let’s go through deploying a HuggingFace model on Azure Machine Learning’s Managed Online Endpoints. For this, we’ll use a custom Dockerfile and configuration files to set up the deployment. As a model, we’ll be using meta-llama/Llama-3.2-11B-Vision on a single Standard_NC24ads_A100_v4 instance.
Step 1: Create a custom Environment for vLLM on AzureML #
First, we create a Dockerfile to define the environment for our model. For this, we’ll be using vllm’s base container that has all the dependencies and drivers included:
FROM vllm/vllm-openai:latest
ENV MODEL_NAME facebook/opt-125m
ENTRYPOINT python3 -m vllm.entrypoints.openai.api_server --model $MODEL_NAME $VLLM_ARGS
The idea here is that we can pass a model name via an ENV variable, so that we can easily define which model we want to deploy during deployment time.
Next, we log into our Azure Machine Learning workspace:
az account set --subscription <subscription ID>
az configure --defaults workspace=<Azure Machine Learning workspace name> group=<resource group>
Now, we create an environment.yml file to specify the environment settings:
$schema: https://azuremlschemas.azureedge.net/latest/environment.schema.json
name: vllm
build:
  path: .
  dockerfile_path: Dockerfile
Then let’s build the environment:
az ml environment create -f environment.yml
Step 2: Deploy the AzureML Managed Online Endpoint #
Time for deployment, so let’s first create an endpoint.yml file to define the Managed Online Endpoint:
$schema: https://azuremlsdk2.blob.core.windows.net/latest/managedOnlineEndpoint.schema.json
name: vllm-hf
auth_mode: key
Let’s create it:
az ml online-endpoint create -f endpoint.yml
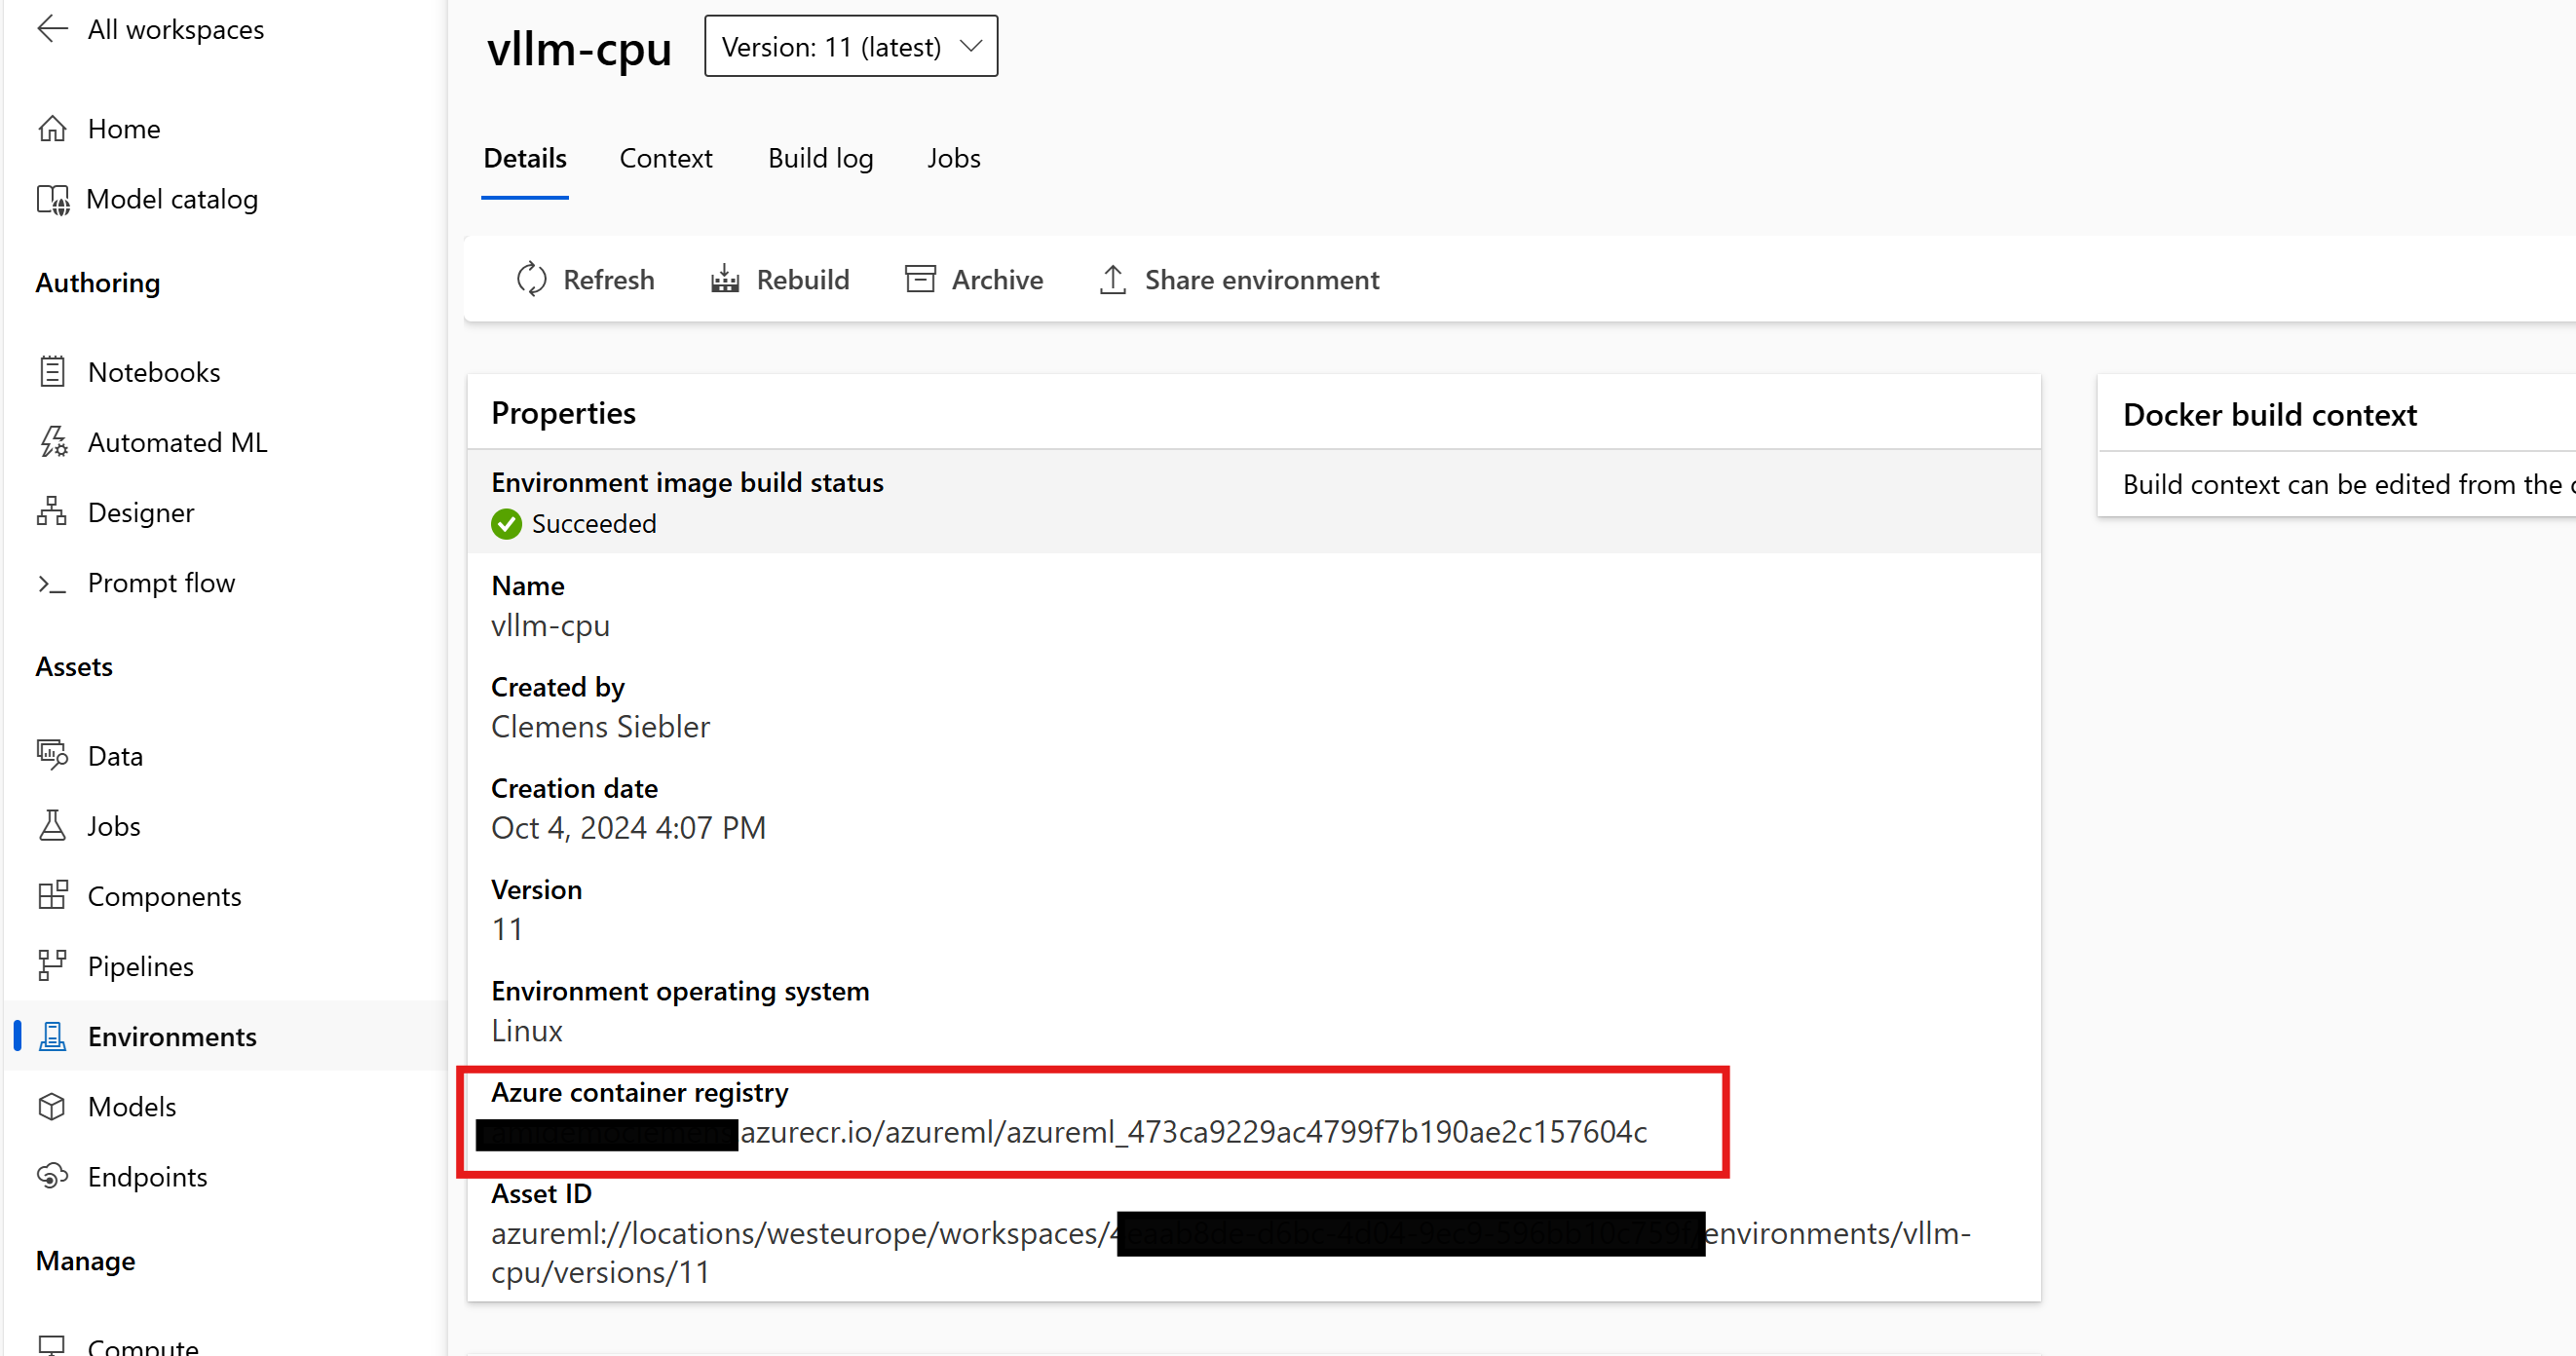
For the next step, we’ll need the address of the Docker image address we created. We can quickly get it from AzureML Studio -> Environments -> vllm:
Finally, we create a deployment.yml file to configure the deployment settings and deploy our desired model from HuggingFace via vLLM:
$schema: https://azuremlschemas.azureedge.net/latest/managedOnlineDeployment.schema.json
name: current
endpoint_name: vllm-hf
environment_variables:
  MODEL_NAME: meta-llama/Llama-3.2-11B-Vision # define the model name using the identifier from HG
  VLLM_ARGS: "" # optional args for vLLM runtime
  HUGGING_FACE_HUB_TOKEN: <Your HF token> # use this, if you want to authenticate to HF
environment:
  image: xxxxxx.azurecr.io/azureml/azureml_xxxxxxxx # paste Docker image address here
  inference_config:
    liveness_route:
      port: 8000
      path: /ping
    readiness_route:
      port: 8000
      path: /health
    scoring_route:
      port: 8000
      path: /
instance_type: Standard_NC24ads_A100_v4
instance_count: 1
request_settings: # This section is optional, yet important for optimizing throughput
    max_concurrent_requests_per_instance: 2
    request_timeout_ms: 10000
liveness_probe:
  initial_delay: 10
  period: 10
  timeout: 2
  success_threshold: 1
  failure_threshold: 30
readiness_probe:
  initial_delay: 120 # wait for 120s before we start probing, so the model can load peacefully
  period: 10
  timeout: 2
  success_threshold: 1
  failure_threshold: 30
Important to point out here is that the request_settings depend a bit on our instance type and number of GPUs and might require some manual tuning to fully optimize throughput. The goal is to find a good tradeoff between concurrency (max_concurrent_requests_per_instance) and queue time in order to avoid either hitting request_timeout_ms from the endpoint side, or any HTTP-timeouts on the client side. Both these scenarios result in HTTP 429, and the client would need to implement exponential backoff (e.g. via tenacity library).
In practice, setting max_concurrent_requests_per_instance to 8 works well for 7bn or 8bn models on a A100 GPU (BF16). Same goes for 70bn models (BF16), where 4x A100 (on a Standard_NC96ads_A100_v4 instance) can handle max_concurrent_requests_per_instance: 8 well, before throughput saturates latency starts to spike.
Lastly, we can deploy the model:
az ml online-deployment create -f deployment.yml --all-traffic
By following these steps, we have deployed a HuggingFace model on Azure Machine Learning’s Managed Online Endpoints, ensuring efficient and scalable real-time inference. Time to test it!
Step 3: Testing the deployment #
First, let’s get the endpoint’s scoring uri and the api keys:
az ml online-endpoint show -n vllm-hf
az ml online-endpoint get-credentials -n vllm-hf
For completion models, we can then call the endpoint using this Python code snippet:
import requests

url = "https://vllm-hf.polandcentral.inference.ml.azure.com/v1/completions"
headers = {
    "Content-Type": "application/json",
    "Authorization": "Bearer xxxxxxxxxxxx"
}
data = {
    "model": "meta-llama/Llama-3.2-11B-Vision",
    "prompt": "San Francisco is a",
    "max_tokens": 200,
    "temperature": 0.7
}

response = requests.post(url, headers=headers, json=data)
print(response.json())
Response:
{
   "id":"cmpl-74bd153fff5740b3ac070e324f99494c",
   "object":"text_completion",
   "created":1728460457,
   "model":"meta-llama/Llama-3.2-11B-Vision",
   "choices":[
      {
         "index":0,
         "text":" top tourist destination known for its iconic landmarks, vibrant neighborhoods, and cultural attractions. Whether you're interested in history, art, music, or food, there's something for everyone in this amazing city. Here are some of the top things to do in San Francisco:...,",
         "logprobs":"None",
         "finish_reason":"length",
         "stop_reason":"None",
         "prompt_logprobs":"None"
      }
   ],
   "usage":{
      "prompt_tokens":5,
      "total_tokens":205,
      "completion_tokens":200
   }
}
Works!
Custom Model Deployment #
So let’s shift gears and deploy our own fine-tuned or own even pre-trained model. How can we use vLLM to deploy this? In short, there are two options:
- In case of being able to upload the model to HuggingFace, we can follow the deployment steps from above or
- If we want to keep the model fully private, we can directly deploy it via AzureML
In this section, we’ll discuss the second option. In order to do so, we’ll perform the following steps:
- Register our custom model in Azure Machine Learning’s Model Registry
- Create a custom vLLM container that supports local model loading
- Deploy the model to Managed Online Endpoints
Step 1: Create a custom Environment for vLLM on AzureML #
First, let’s create a custom vLLM Dockerfile that takes a MODEL_PATH as input. This path will be used by AzureML to mount our custom model.
FROM vllm/vllm-openai:latest
ENV MODEL_PATH "/models/opt-125m"
ENTRYPOINT python3 -m vllm.entrypoints.openai.api_server --model $MODEL_PATH $VLLM_ARGS
Then, let’s log into our Azure Machine Learning workspace:
az account set --subscription <subscription ID>
az configure --defaults workspace=<Azure Machine Learning workspace name> group=<resource group>
Next, we create an environment.yml file to specify the environment settings:
$schema: https://azuremlschemas.azureedge.net/latest/environment.schema.json
name: vllm-custom-model
build:
  path: .
  dockerfile_path: Dockerfile
Then let’s build the environment:
az ml environment create -f environment.yml
Step 2: Register custom model in Model Registry #
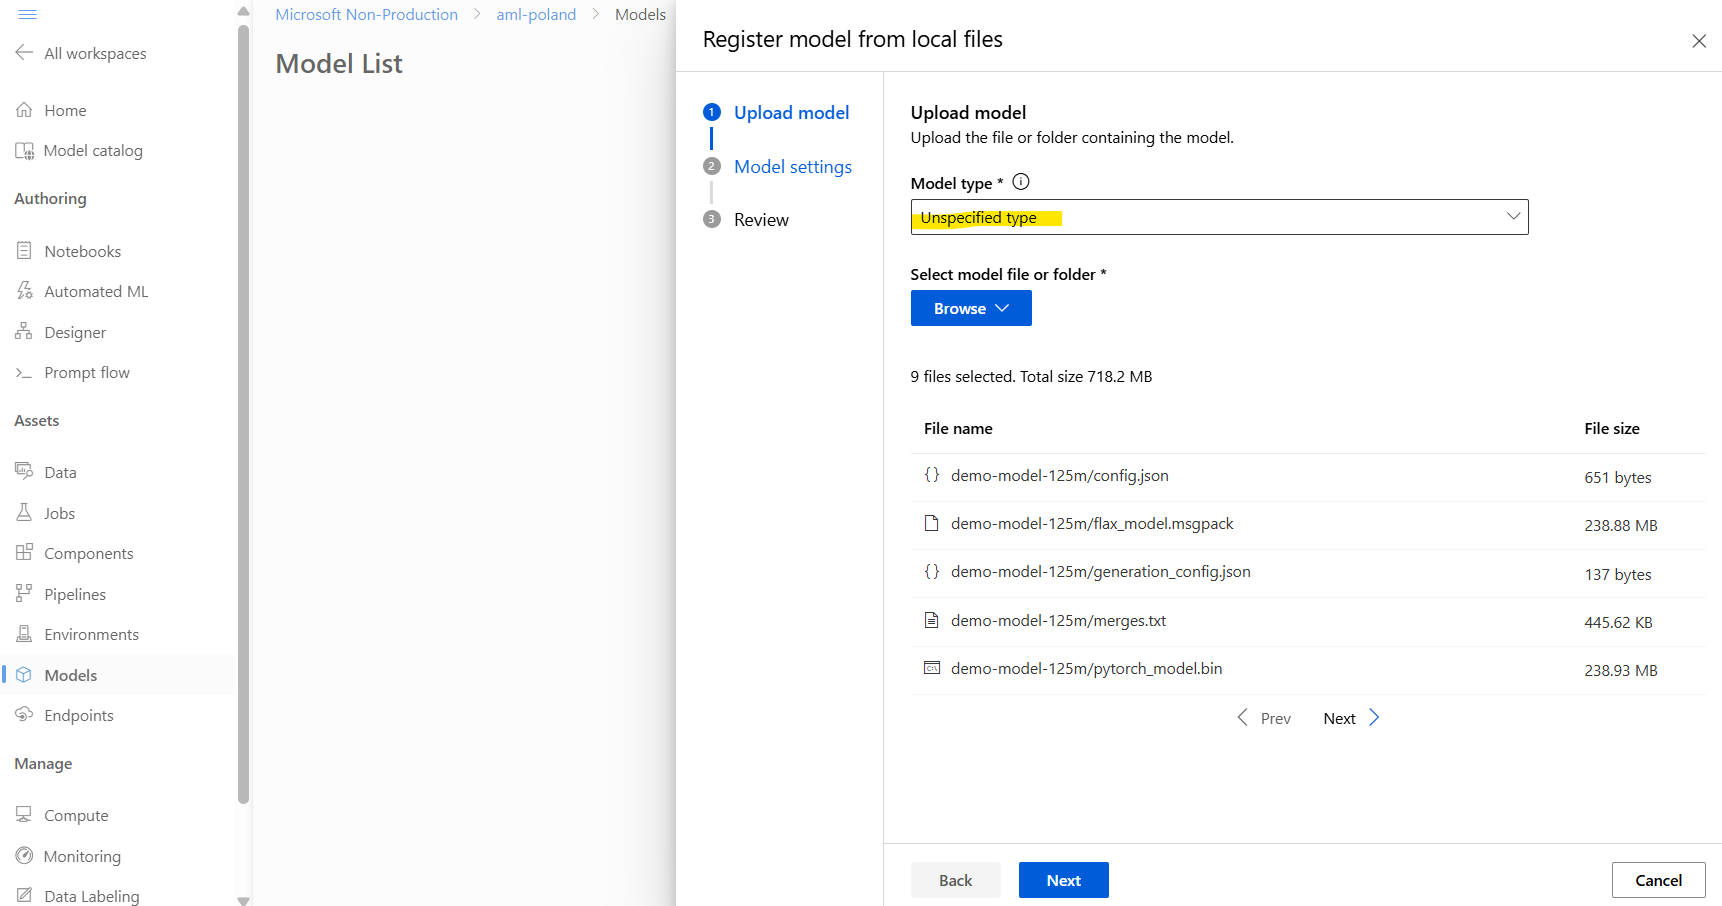
Before we continue, we need to register our model. For this, we can go to AzureML Studio, select Models, then select Register. There, we can register our model as Unspecified type and reference the whole folder, which contains all our model’s artifacts:
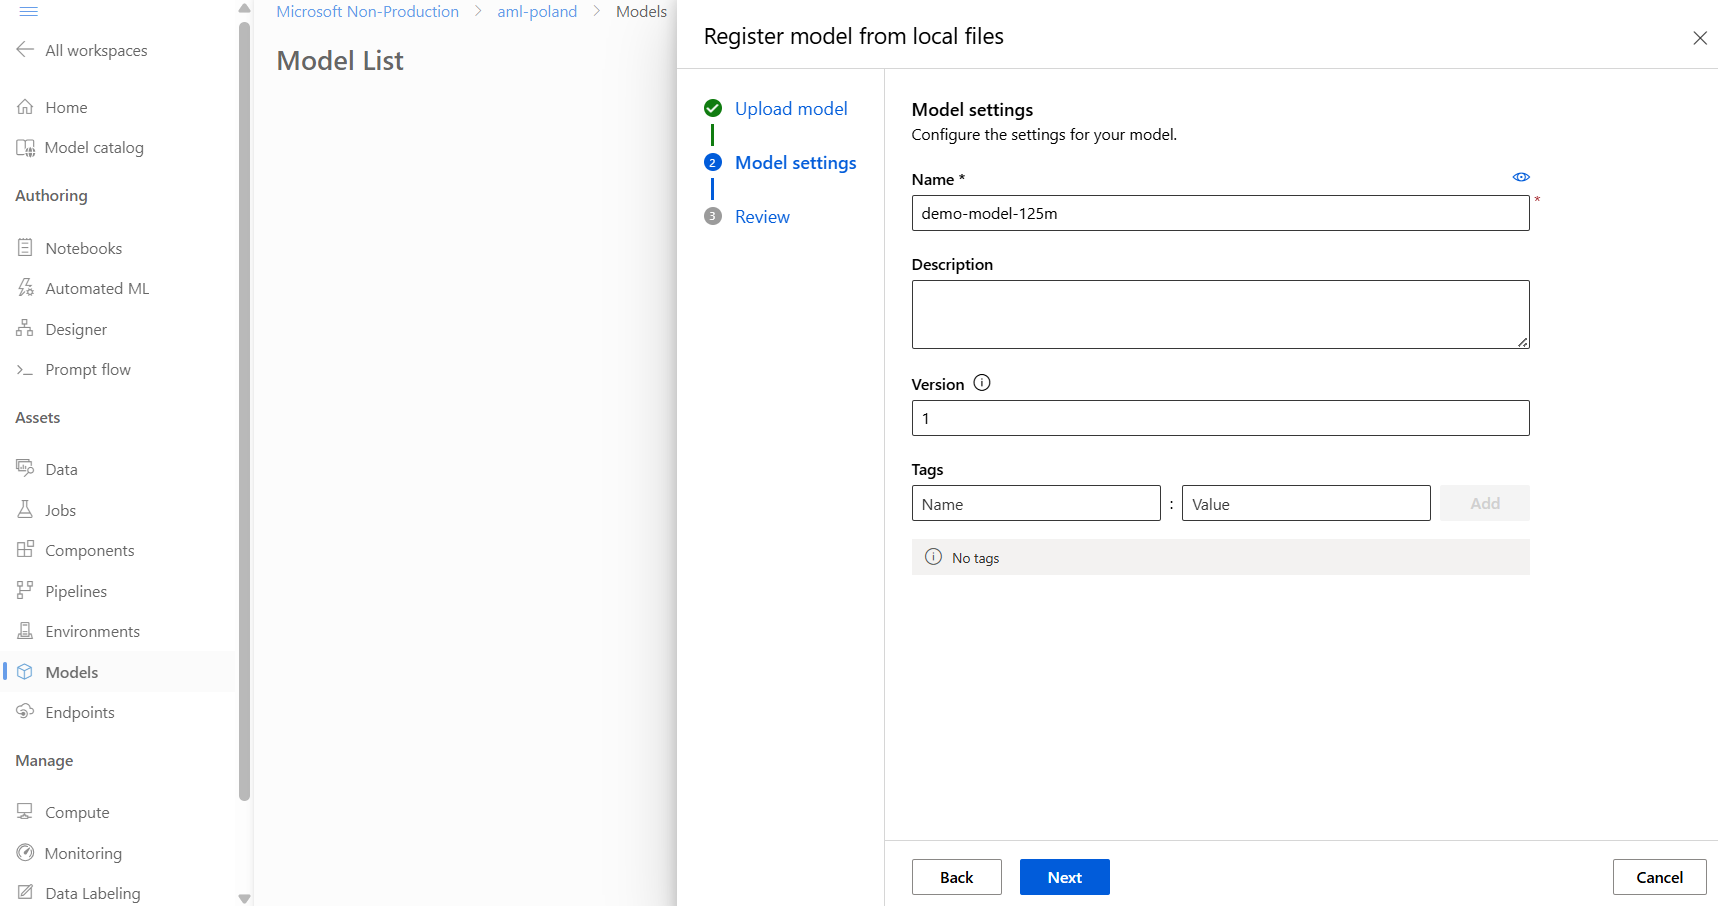
Next, let’s name our model:
And check the final summary before uploading it:
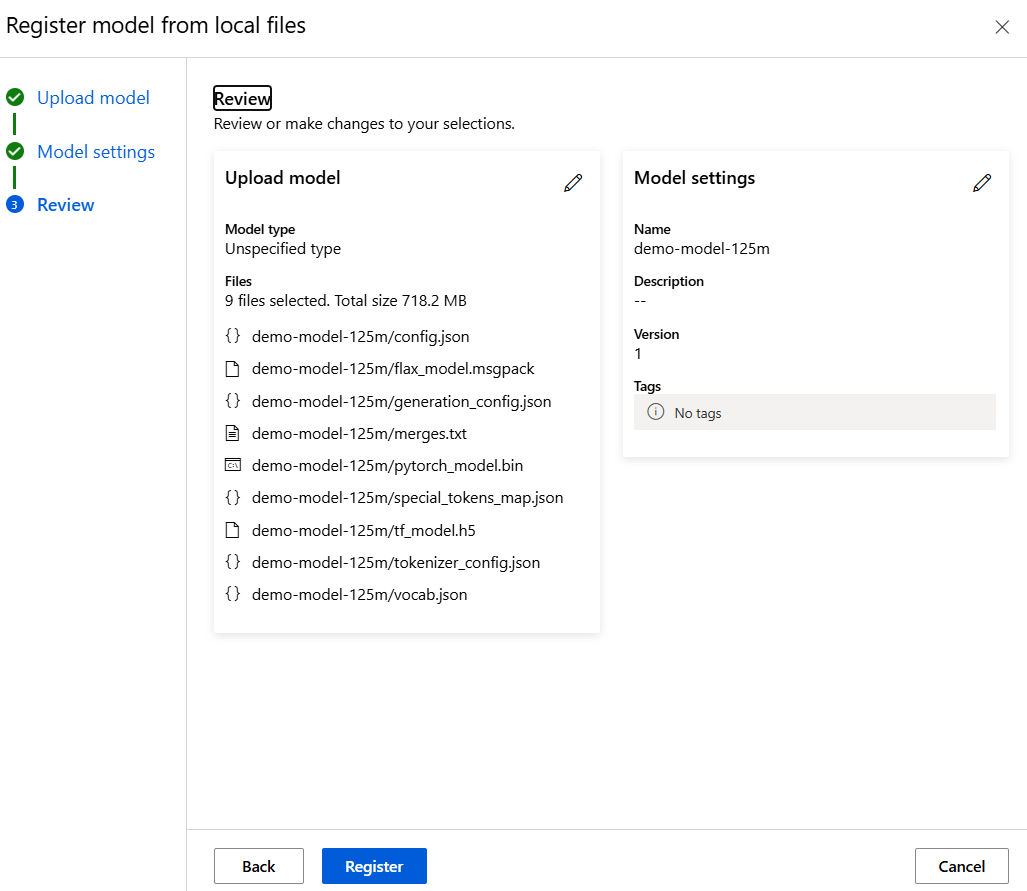
The folder name will later determine the model’s name during inference API calls. In our case, this will be demo-model-125m, derived from the base folder name of the model.
Step 3: Deploy the AzureML Managed Online Endpoint #
It’s deployment time! First, we create our endpoint.yml file to define the Managed Online Endpoint:
$schema: https://azuremlsdk2.blob.core.windows.net/latest/managedOnlineEndpoint.schema.json
name: vllm-hf
auth_mode: key
Then, we create it:
az ml online-endpoint create -f endpoint.yml
For the next step, we’ll need the Docker image address, which we can quickly get from AzureML Studio -> Environments -> vllm-custom-model:
Finally, we create a deployment.yml file to configure the deployment settings and deploy our desired model from HuggingFace via vLLM:
$schema: https://azuremlschemas.azureedge.net/latest/managedOnlineDeployment.schema.json
name: current
endpoint_name: vllm-hf
model: azureml:demo-model-125m:1 # specify our registered model
model_mount_path: /models # mount to /models path, so model will show up /models/demo-model-125m
environment_variables:
  MODEL_PATH: /models/demo-model-125m # this will need to be set, so vLLM knows where to find the model
  VLLM_ARGS: ""
environment:
  image: xxxxxx.azurecr.io/azureml/azureml_xxxxxxxx # paste Docker image address here
  inference_config:
    liveness_route:
      port: 8000
      path: /health
    readiness_route:
      port: 8000
      path: /health
    scoring_route:
      port: 8000
      path: /
instance_type: Standard_NC24ads_A100_v4
instance_count: 1
request_settings:
    max_concurrent_requests_per_instance: 2
    request_timeout_ms: 10000
liveness_probe:
  initial_delay: 10
  period: 10
  timeout: 2
  success_threshold: 1
  failure_threshold: 30
readiness_probe:
  initial_delay: 120
  period: 10
  timeout: 2
  success_threshold: 1
  failure_threshold: 30
Here, our focus should be on top the top section:
model: azureml:demo-model-125m:1- This is the identifier under which our model was registered (azureml:<name>:<version>)model_mount_path: /models- This is to tell our Managed Online Endpoint, under which mount point it should mount the modelenvironment_variables–>MODEL_PATH: /models/demo-model-125m- This is the path were our vLLM Docker container will look for the model’s filesenvironment_variables–>VLLM_ARGS: ""- Any additional args for vLLM (see section above)
For configuring the request_settings section properly, see the steps above.
Lastly, we can deploy the model:
az ml online-deployment create -f deployment.yml --all-traffic
Step 4 - Testing the deployment #
Again, let’s get the endpoints scoring uri and the api keys:
az ml online-endpoint show -n vllm-hf
az ml online-endpoint get-credentials -n vllm-hf
We can then call the endpoint using this Python code snippet:
import requests

url = "https://vllm-hf.polandcentral.inference.ml.azure.com/v1/completions"
headers = {
    "Content-Type": "application/json",
    "Authorization": "Bearer xxxxxxxxxxxx"
}
data = {
    "model": "/models/demo-model-125m",
    "prompt": "San Francisco is a",
    "max_tokens": 200,
    "temperature": 0.7
}

response = requests.post(url, headers=headers, json=data)
print(response.json())
{
   "id":"cmpl-50b8b30f820b418689576bc23ece3d16",
   "object":"text_completion",
   "created":1728471381,
   "model":"/models/demo-model-125m",
   "choices":[
      {
         "index":0,
         "text":" great place to live.\nI've heard of San Francisco, but I've never been.",
         "logprobs":"None",
         "finish_reason":"stop",
         "stop_reason":"None",
         "prompt_logprobs":"None"
      }
   ],
   "usage":{
      "prompt_tokens":5,
      "total_tokens":25,
      "completion_tokens":20
   }
}
Autoscaling our vLLM endpoint #
Autoscaling Managed Online Endpoint deployments in Azure Machine Learning allows us to dynamically adjust the number of instances allocated to our endpoints based on real-time metrics and schedules. This ensures that our application can handle varying loads efficiently without manual intervention. By integrating with Azure Monitor, you can set up rules to scale out when the CPU or GPU utilization exceeds a certain threshold or scale in during off-peak hours. For detailed guidance on configuring autoscaling, you can refer to the official documentation.
Summary #
In this post, we’ve discussed how to deploy vLLM models using Azure Machine Learning’s Managed Online Endpoints for efficient real-time inference. We introduced vLLM as a high-throughput, memory-efficient inference engine for LLMs, with the focus of deploying models from HuggingFace. The guide outlined the steps for creating a custom environment, defining the endpoint, and deploying a model using Azure CLI commands. We also looked at examples for testing the deployed model. Additionally, we explored how to deploy custom models while keeping them private.