Azure Machine Learning Custom Images (for Advanced Scenarios)
Table of Contents
Introduction #
This posts shows how to use custom images in Azure Machine Learning for model training. “Why would I need that?” – you might ask – “Doesn’t AzureML handle all of this?” – and yes, you’re right, Azure Machine Learning does all of that. However, there are a few scenarios where building your own custom images enables a few new scenarios:
- Inclusion of libraries not available via pip/conda (odbc drivers, etc.)
- Stricter security processes (image creation, scanning, consumption)
- Enable scenarios, where Azure Machine Learning is not allowed to talk the non-Azure resources on the internet (e.g., PyPI, conda-forge, etc.)
- These might not be your typical everyday use cases, but especially in more lock-down, secured environments, these scenarios are quite common.
So let’s get started!
Building Custom Images #
The idea of custom images for Azure Machine Learning is that you take one of the base AML images and add your additional Docker image layers on top of them. You can refer to this repo for getting a list of all the base images available for Azure Machine Learning. I typically end up using one of these:
mcr.microsoft.com/azureml/intelmpi2018.3-ubuntu16.04mcr.microsoft.com/azureml/openmpi3.1.2-ubuntu<x>.04 (x=16/18)mcr.microsoft.com/azureml/openmpi3.1.2-cuda10.y-cudnn7-ubuntu<x>.04 (x=16/18, y=0/1/2)
But wait, can’t I build a fully-customized image from scratch? Yes, you can, but I would not recommend it as using the AML base images will ensure that your resulting image will (very likely) stay compatible with AML.
For this post, I’ve created this example repo as a starting point: https://github.com/csiebler/aml-custom-image – feel free to clone it and get started.
To keep it simple, I’ve just put a simple requirements.txt that gets installed into the image (see Dockerfile):
FROM mcr.microsoft.com/azureml/base:intelmpi2018.3-ubuntu16.04

COPY requirements.txt /tmp/requirements.txt
RUN pip install -r /tmp/requirements.txt
From here, add all the stuff you want to package into your custom image.
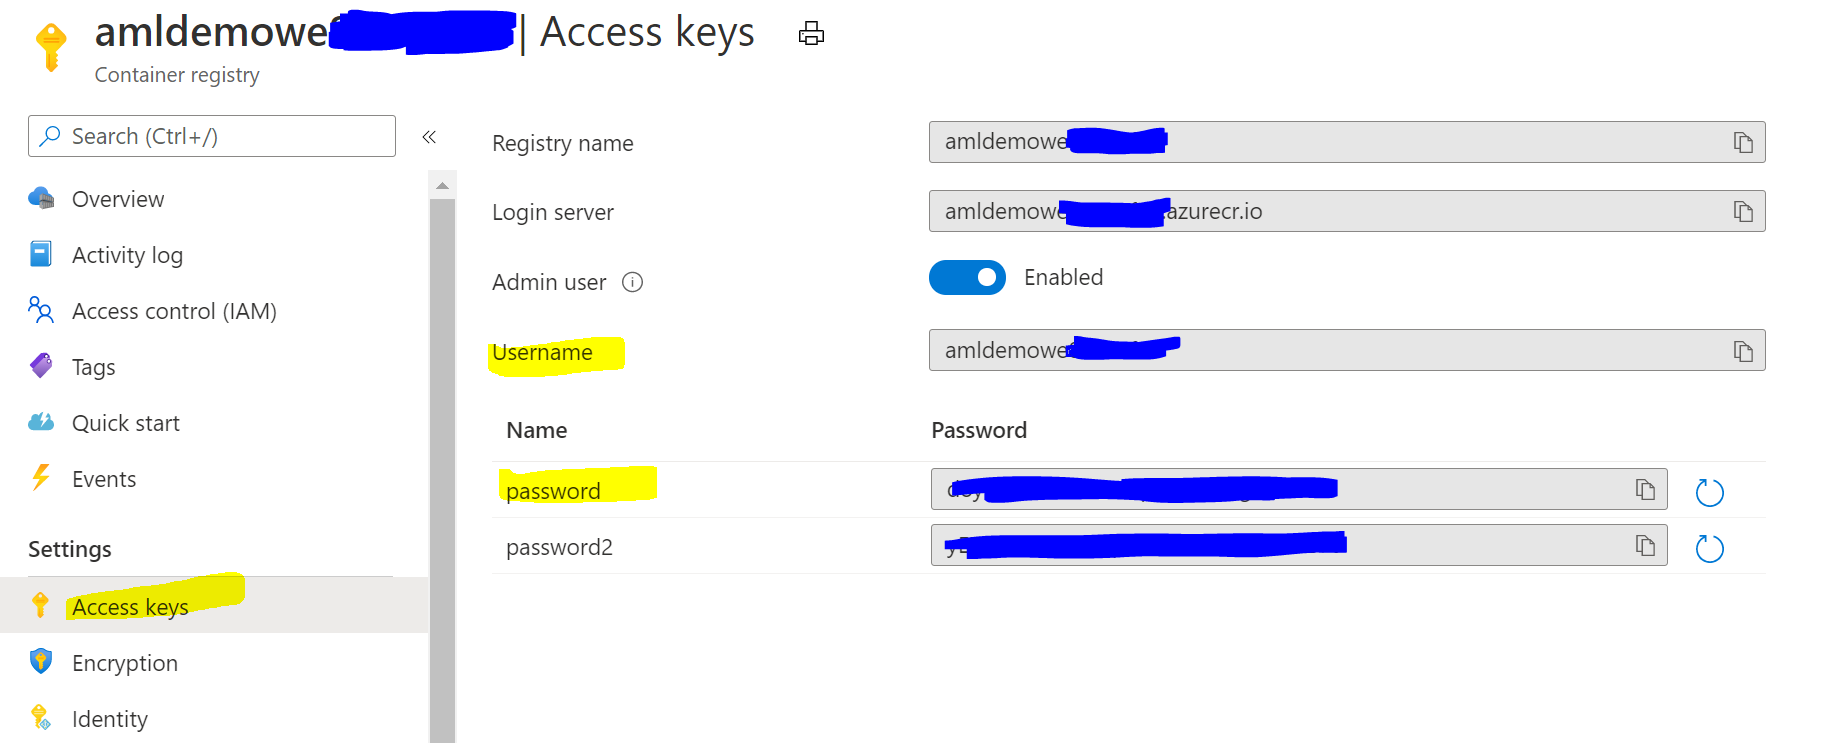
Once done, let’s build this image and put it to work! I assume you already have a AML workspace up again running. So first, let’s log in to your Azure Container Registry via CLI:
az acr login --name amldemowe12345
docker login amldemowe12345.azurecr.io
You can easily retrieve the login credentials for the Container Registry through the Azure Portal:
Next, you can build the image and push it to the registry:
docker build . -t amldemowe12345.azurecr.io/azureml-images/scikit-learn:0.23.2
docker push amldemowe12345.azurecr.io/azureml-images/scikit-learn:0.23.2
Great, now we’ve pushed the image, we can get started to run some training jobs with it!
Training using Custom Images #
Let’s look how we can use the new image and run a training job with it, either with the CLI or the Python SDK.
Using the az ml CLI #
You can run a training job in AML by editing the training.runconfig from the repo and update the docker -> baseImage section to point to your newly created image:
  ...
  docker:
    enabled: true
    baseImage: amldemowe12345.azurecr.io/azureml-images/scikit-learn:0.23.2
    ...
Next, we can use the az ml CLI to attach to the workspace. This will authenticate us and set the resource group/workspace as default for subsequent CLI commands. From there, we can kick off the training using the training.runconfig:
az ml folder attach -g aml-demo -w aml-demo
az ml run submit-script -c training -e custom-image-training
If you look at the training run in the ML Studio, you can see that the image has been pulled correctly, without AML building its own image:

Using the Python SDK #
Alternatively, you can run this example via the Python SDK:
from azureml.core import Workspace, Environment
from azureml.core import ScriptRunConfig
from azureml.core.compute import ComputeTarget
from azureml.core import Experiment

ws = Workspace.from_config()

custom_env = Environment("custom_env")
custom_env.docker.enabled = True
custom_env.python.user_managed_dependencies = True
custom_env.docker.base_image = "amldemowe12345.azurecr.io/azureml-images/scikit-learn:0.23.2"

cluster_name = "cpu-cluster"
compute_target = ComputeTarget(workspace=ws, name=cluster_name)

src = ScriptRunConfig(source_directory='./train-example',
                      script='train.py',
                      compute_target=compute_target,
                      environment=custom_env)

run = Experiment(ws,'custom-image-training').submit(src)
run.wait_for_completion(show_output=True)
Again, use the log output from the training run in the Studio UI to confirm, that AML used your custom image!
Next Steps #
From here, I would recommend to automate building your custom Docker images through e.g., Azure DevOps or GitHub Actions. This will also allow you to further harden the image by e.g., integrating with third-party image scanning capabilities and others.
Summary #
In conclusion, using custom images with Azure Machine Learning is a great way to control which packages are being during model training. Typically, AML does this automatically for us, but in more restrictive environments, it is often desired to do this outside in a CI/CD pipeline. Furthermore, custom images help us to enable environments where internet access for AML can be safely disabled.
I hope this post was helpful – feel free to reuse the code from https://github.com/csiebler/aml-custom-image.