Azure Active Directory (AAD) authentication for Azure Cognitive Services
Table of Contents
Introduction #
In this post we’ll show how you can use Azure Active Directory to authenticate against Azure Cognitive Services. This greatly improves security over using key-based authentication methods. This is because AAD authentication allows us to use Cognitive Services without any passwords or secrets, but rather relies on the identity of the user or Managed Identity (e.g., a VM). Furthermore, it helps with tightening resource access: An access key for Cognitive Services can easily be passed on to somebody else, but passing on a identity is typically not (easily) possible.
For this post, we’ll demonstrate how this can be done for the following three Cognitive Services:
- Speech API
- Read API (via Computer Vision API)
- Language API
However, if you want to authenticate to other Azure Cognitive Services or Azure Search have a look at this repo.
Instructions #
Let’s directly get started with provisioning some Cognitive Service resources.
Create resources #
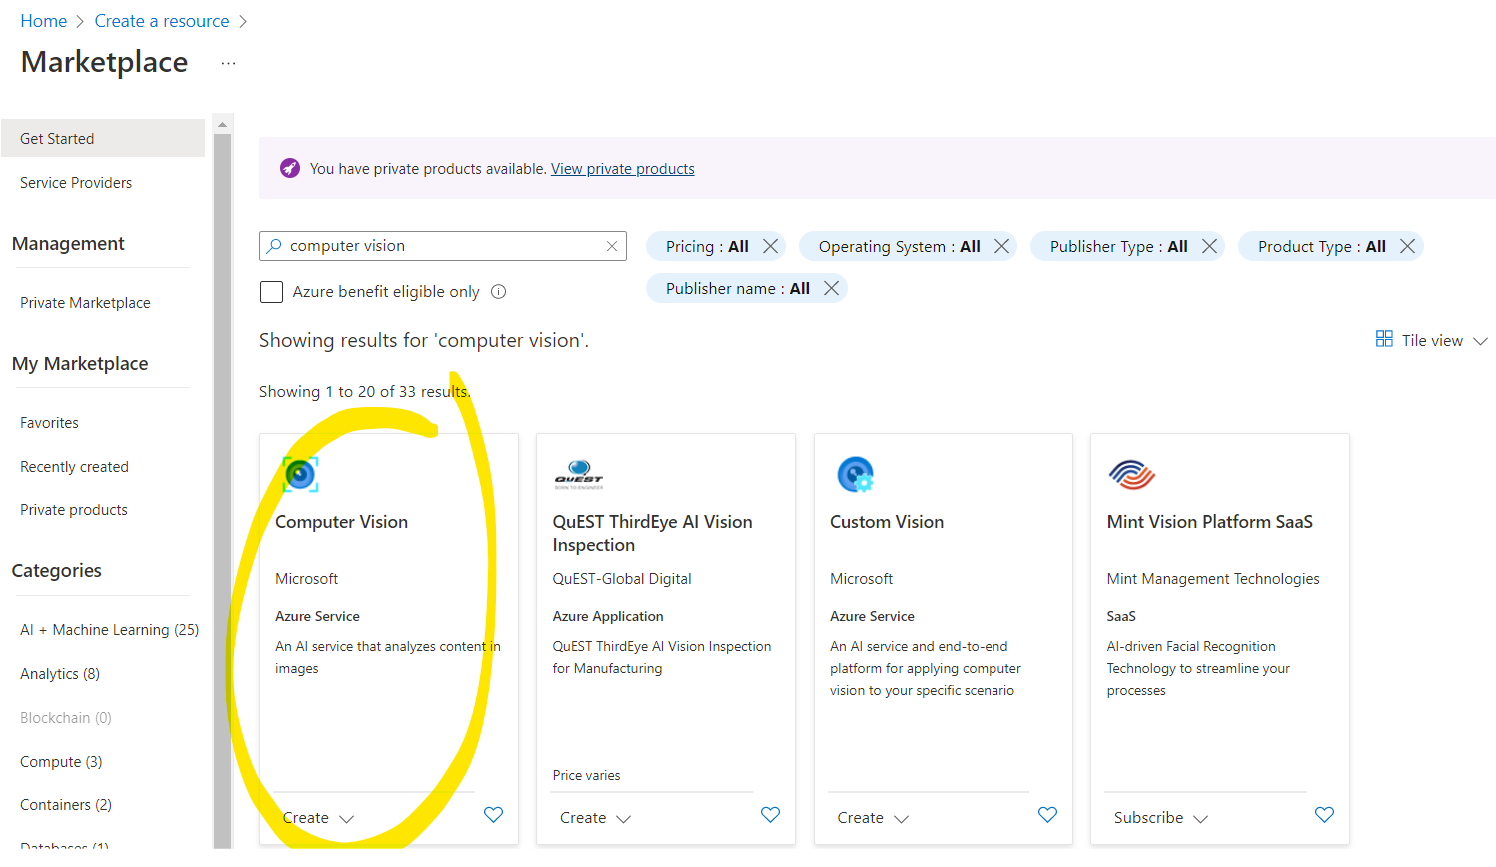
First, let’s create a new Computer Vision resource in the Azure Portal:
Once done, we can repeat the same steps for “Speech” and “Language service” resources.
Assign permissions #
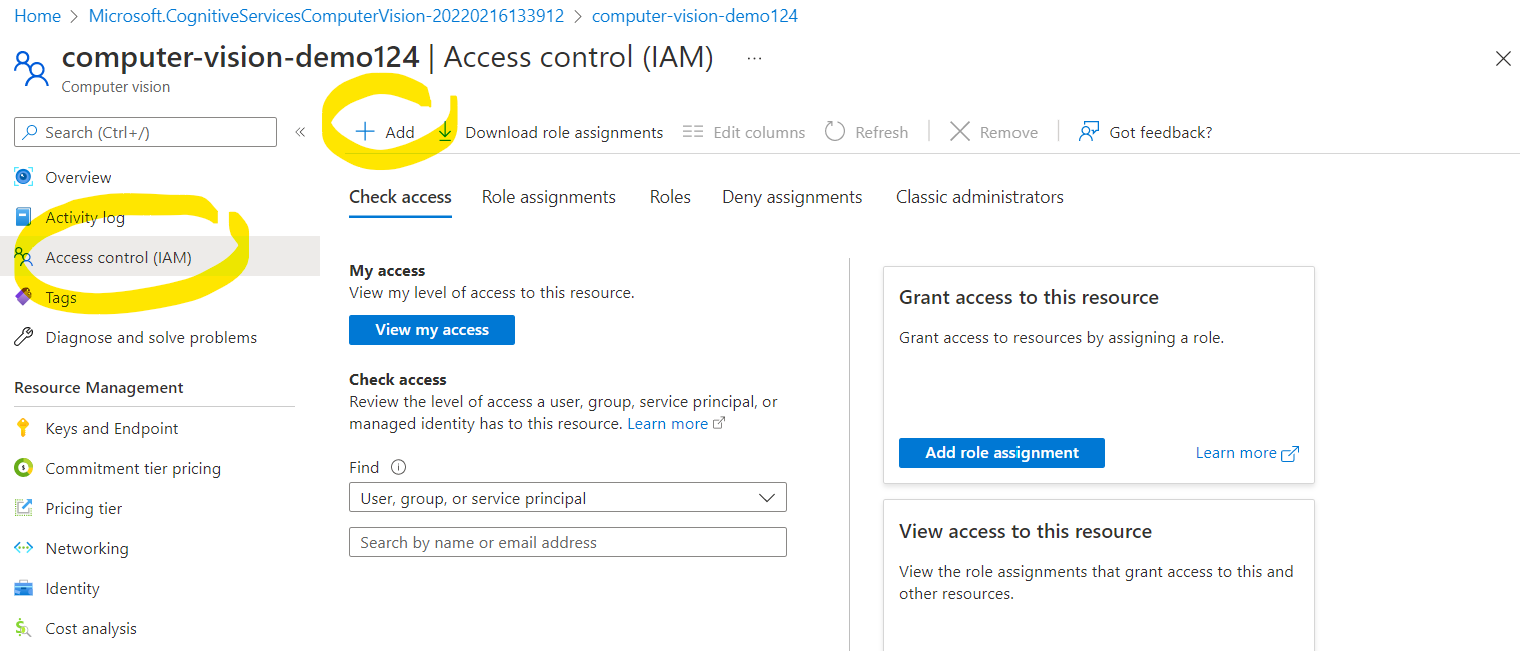
Once your resources have been provisioned, go into each of them, select “Access Control (IAM)” and then click “Add” to perform a “Add Role Assignment”:
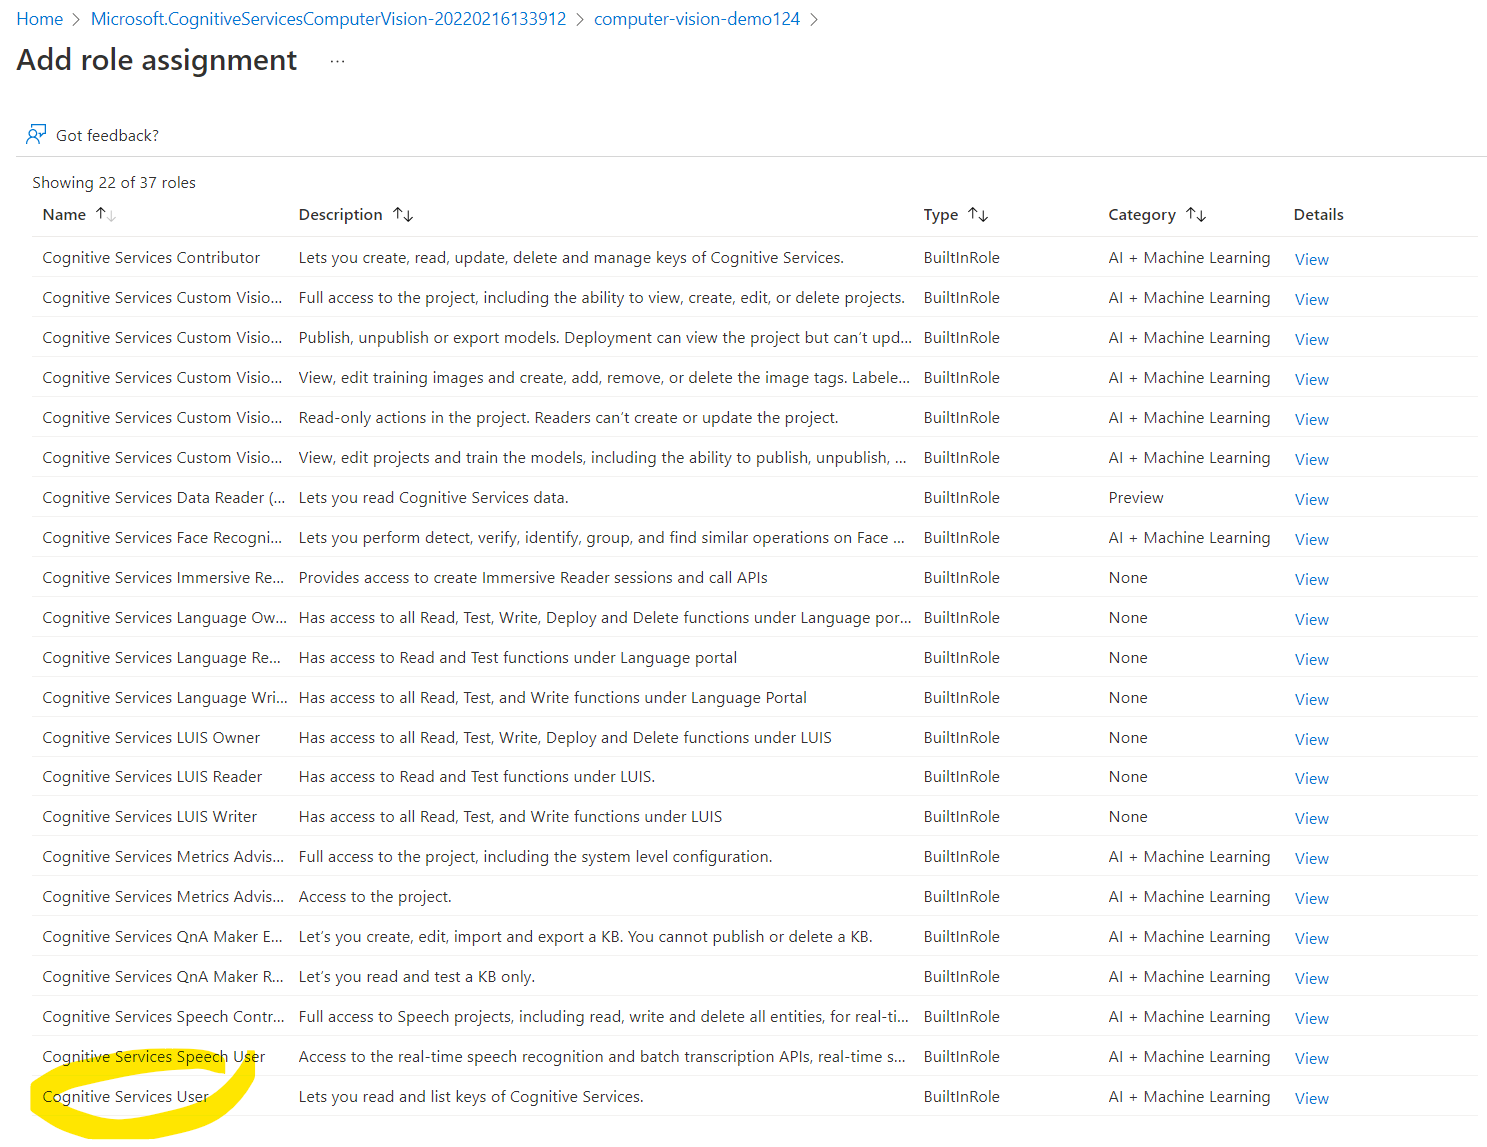
In the role selection screen, we need to select Cognitive Services User. This role allows us later to access the APIs using Azure Active Directory authentication.
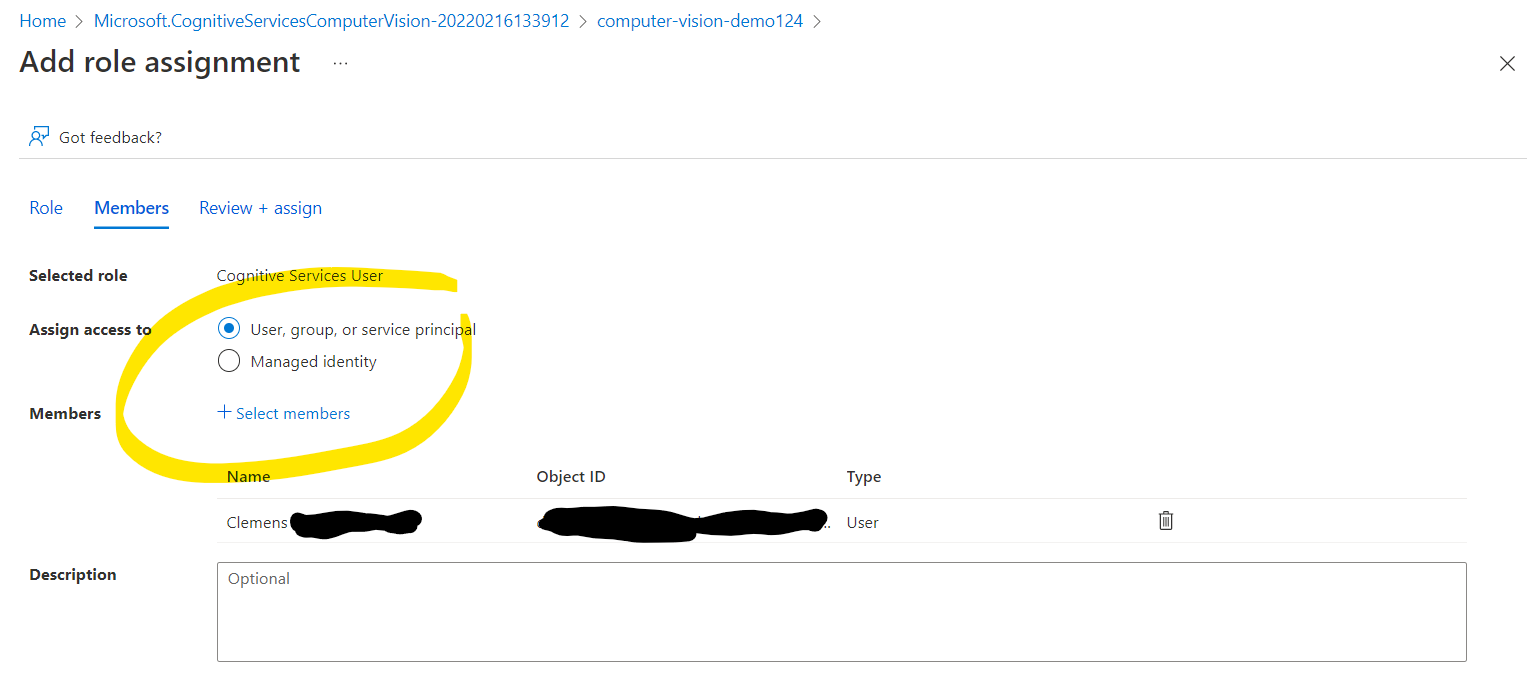
Under the role assignment screen, assign the role to yourself, or alternatively to a Managed Identity (e.g. the identity of a VM).
Click through the review and assign the permission. Optionally repeat the same for your “Speech” and “Language service” resources.
Authenticate #
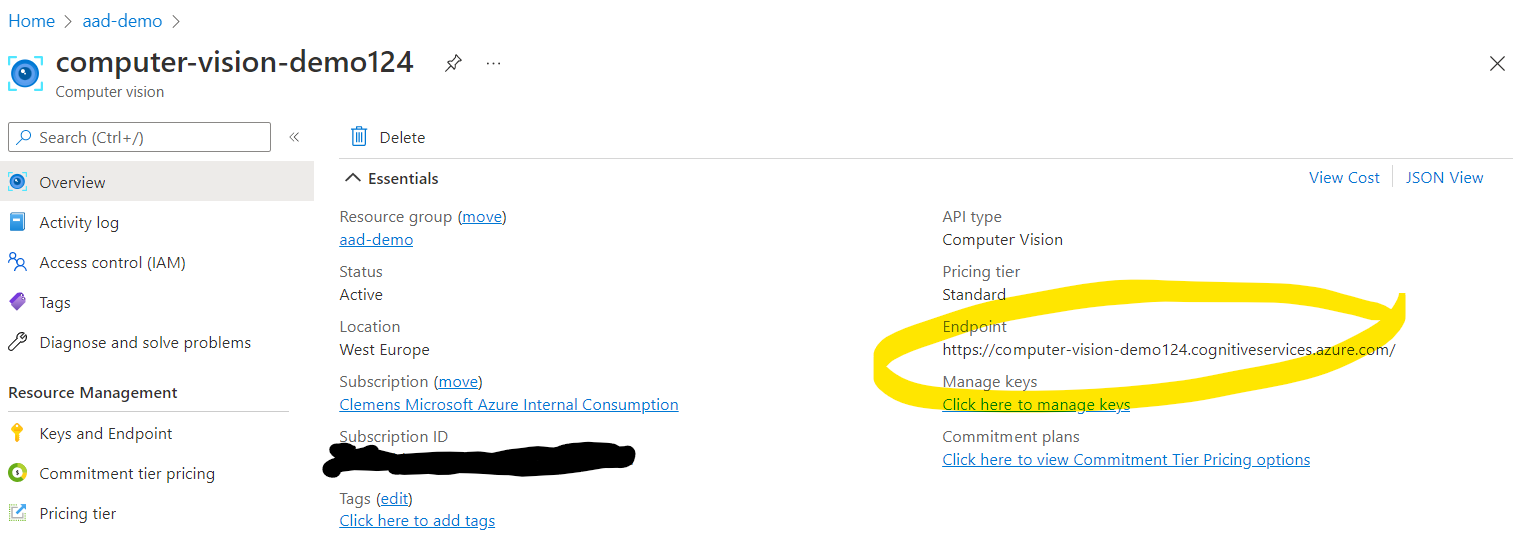
We’re nearly there, we just need to retrieve the Endpoint URL for our Cognitive Service. Since we’re not authenticating with a key, the hostname is used to understand against which resource the API should go. You can find the Endpoint URL in your resource’s overview screen in the Azure Portal:
That’s it, let’s try to authenticate at the resources using just our user or a Managed Identity. For this code to run, make sure you do a pip install azure-identity first.
import os
import time
import requests
from azure.identity import AzureCliCredential, ChainedTokenCredential, ManagedIdentityCredential

# Update this with your computer vision endpoint
endpoint = 'https://<your_computer_vision_hostname>.cognitiveservices.azure.com')

# Define strategy which potential authentication methods should be tried to gain an access token
credential = ChainedTokenCredential(ManagedIdentityCredential(), AzureCliCredential())
access_token = credential.get_token("https://cognitiveservices.azure.com/")

headers = {
    "Content-Type": "application/json",
    "Authorization": f"Bearer {access_token.token}"
}

json = {
    "url": "https://github.com/Azure-Samples/cognitive-services-python-sdk-samples/raw/master/samples/vision/images/make_things_happen.jpg"
}

params = {
    "language": "en",
    "pages": "1",
    "readingOrder": "natural"
}

r = requests.post(url=f"{endpoint}/vision/v3.2/read/analyze", params=params, headers=headers, json=json)

print(f"Status code: {r.status_code}")

if (r.status_code == 202):
    # Too lazy to query status of the job, so just wait - do not use this in your code :)
    time.sleep(5)
    r = requests.get(url=r.headers["Operation-Location"], headers=headers)
    print(f"Status code: {r.status_code}")
    print(f"Response body: {r.json()}")
So what does this code do?
First of all, our code tries to retrieve an oauth token from AAD, using either a Managed Identity (e.g., when running the code on VM) or an Azure CLI-based credential. For the latter to work, you will need to have the Azure CLI installed and also successfully logged in using az login. In this case, we rely on the new Azure Identity library which does all the heavy lifting for us. This allows us to easily request a token against the scope of Cognitive Services:
credential = ChainedTokenCredential(ManagedIdentityCredential(), AzureCliCredential())
access_token = credential.get_token("https://cognitiveservices.azure.com/")
Now, instead of sending a key using key-based access, we can use the token in the header to authenticate:
headers = {
    "Content-Type": "application/json",
    "Authorization": f"Bearer {access_token.token}"
}
Using the same approach with Language Service #
This approach will work for most Cognitive Services APIs. For example, we can use the same approach to authenticate to the Language service:
import os
import time
import requests
from azure.identity import AzureCliCredential, ChainedTokenCredential, ManagedIdentityCredential

# Update this with your language service endpoint
endpoint = 'https://<your_language_hostname>.cognitiveservices.azure.com'

# Define strategy which potential authentication methods should be tried to gain an access token
credential = ChainedTokenCredential(ManagedIdentityCredential(), AzureCliCredential())
access_token = credential.get_token("https://cognitiveservices.azure.com/")

headers = {
    "Content-Type": "application/json",
    "Authorization": f"Bearer {access_token.token}"
}

json = {
  "analysisInput": {
    "documents": [
      {
        "language": "en",
        "id": "1",
        "text": "Translator is a cloud-based neural machine translation service that is part of the Azure Cognitive Services family of REST APIs. Translator can be used with any operating system and powers many Microsoft products and services used by thousands of businesses worldwide to perform language translation and other language-related operations. In this overview, you'll learn how Translator can enable you to build intelligent, multi-language solutions for your applications across all supported languages."
      },
      {
        "language": "de",
        "id": "2",
        "text": "Der Übersetzer ist ein cloudbasierter Dienst für neuronale maschinelle Übersetzung, der zur Azure Cognitive Services-Familie der REST-APIs gehört. Der Übersetzer kann mit jedem Betriebssystem verwendet werden und unterstützt viele Microsoft-Produkte und -Dienste, die von Tausenden von Unternehmen weltweit verwendet werden, um Sprachübersetzungen und andere sprachbezogene Vorgänge durchzuführen. In dieser Übersicht erfahren Sie, wie Sie mit dem Übersetzer intelligente, mehrsprachige Lösungen für Ihre Anwendungen in allen unterstützten Sprachen erstellen können."
      }
    ]
  },
  "tasks": {
    "extractiveSummarizationTasks": [
      {
        "parameters": {
          "model-version": "latest",
          "sentenceCount": 2,
          "sortBy": "Rank"
        }
      }
    ]
  }
}

r = requests.post(url=f"{endpoint}/text/analytics/v3.2-preview.1/analyze", headers=headers, json=json)

print(f"Status code: {r.status_code}")

if (r.status_code == 202):
    # Too lazy to query status of the job, so just wait - do not use this in your code :)
    time.sleep(5)
    r = requests.get(url=r.headers["Operation-Location"], headers=headers)
    print(f"Status code: {r.status_code}")
    print(f"Response body: {r.json()}")
If you want to try it out with other services, have a look at this repo.
Authenticating to Speech API #
For accessing most (potentially all) Cognitive Services directly via their REST API, this approach will work fine. However, Speech API for example offers a Python SDK that relies on their WebSocket streaming interface, so we can’t do a plain REST-based request. In this case, the authentication is slightly different.
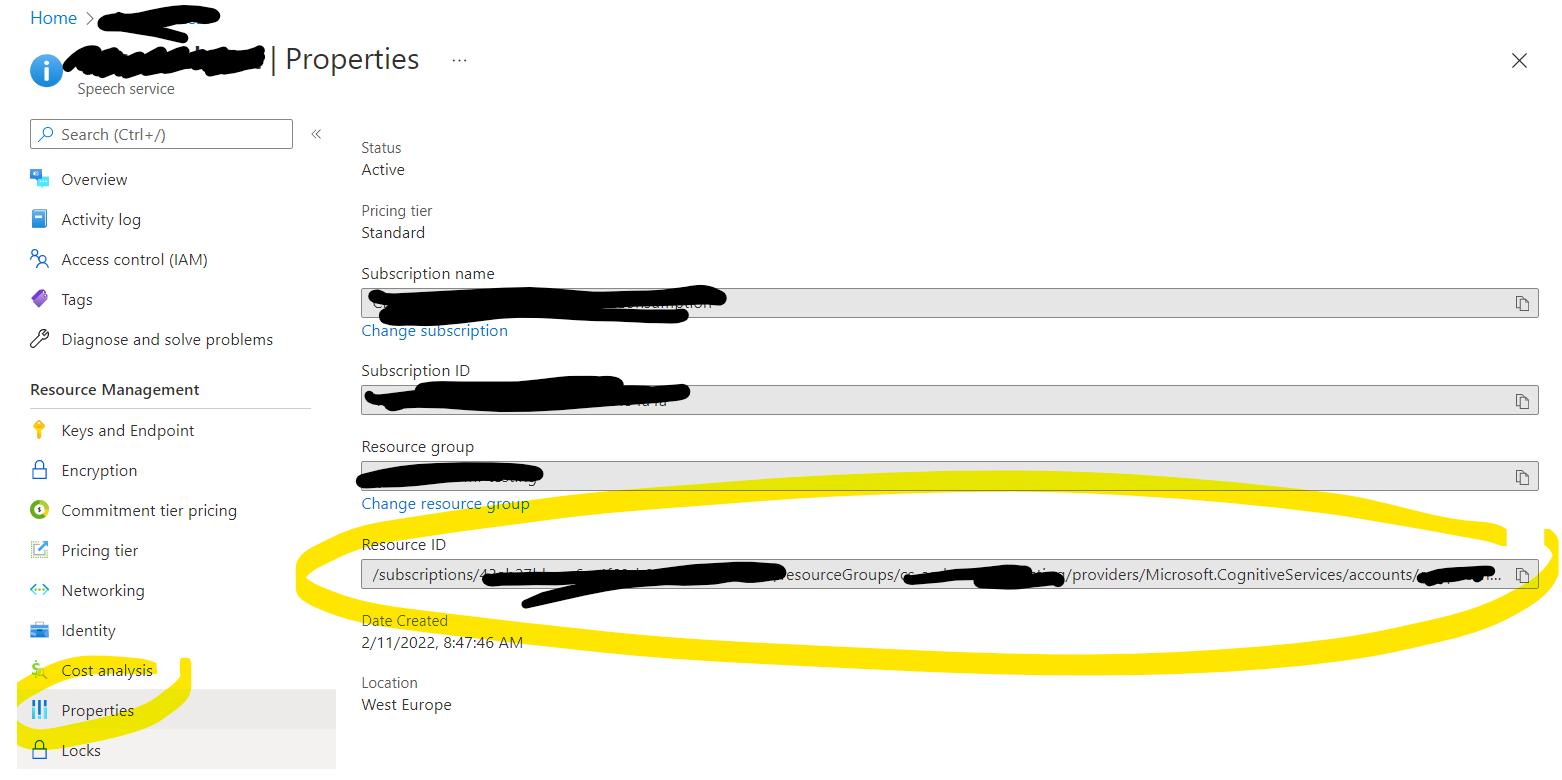
For this, first retrieve the region and the resource id of your Speech resource:
Once retrieved, we can update the following code and use it to authenticate to the Speech API using AAD. Make sure to run pip install azure-cognitiveservices-speech first.
import os
from azure.identity import AzureCliCredential, ChainedTokenCredential, ManagedIdentityCredential
import azure.cognitiveservices.speech as speechsdk

# Update with your Speech API resource id
resource_id = '/subscriptions/<subscription_id>/resourceGroups/<resource_group>/providers/Microsoft.CognitiveServices/accounts/<speech_resource_name>'
region = "westeurope" # update to your region

credential = ChainedTokenCredential(ManagedIdentityCredential(), AzureCliCredential())
access_token = credential.get_token("https://cognitiveservices.azure.com/")

authorization_token = "aad#" + resource_id + "#" + access_token.token

def from_mic():
    speech_config = speechsdk.SpeechConfig(auth_token=authorization_token, region=region)
    speech_recognizer = speechsdk.SpeechRecognizer(speech_config=speech_config)

    print("Say something...")
    result = speech_recognizer.recognize_once_async().get()

    if result.reason == speechsdk.ResultReason.RecognizedSpeech:
        print("Recognized: {}".format(result.text))
    elif result.reason == speechsdk.ResultReason.NoMatch:
        print("No speech could be recognized: {}".format(result.no_match_details))
    elif result.reason == speechsdk.ResultReason.Canceled:
        cancellation_details = result.cancellation_details
        print("Speech Recognition canceled: {}".format(cancellation_details.reason))
        if cancellation_details.reason == speechsdk.CancellationReason.Error:
            print("Error details: {}".format(cancellation_details.error_details))

from_mic()
In this case, the Speech Python SDK does not seem to allow using the custom hostname, hence relies on the resource id to retrieve the correct Cognitive Service to authenticate against.
Summary #
This post showed how we can use Azure Active Directory-based authentication with Azure Cognitive Services. For this we relied on the new Azure Identity library and then used REST-based API calls to access the services. If you want to authenticate to other Azure Cognitive Services or Azure Search have a look at this repo.
With this approach, we can keep our code clear of any credentials and do not need to use any credentials during development either. This greatly increases security and removes unnecessary attack vectors (e.g., by using Managed Identities in production).
If you want to learn how to use Cognitive Services to read data that is protected by VNETs, have a look at the next post: Using Cognitive Services Read API with data secured by VNET.